Diy in-wall gun cabinet: installing a hidden firearm safe
DIY In-Wall Gun Cabinet: Installing a Hidden Firearm Safe
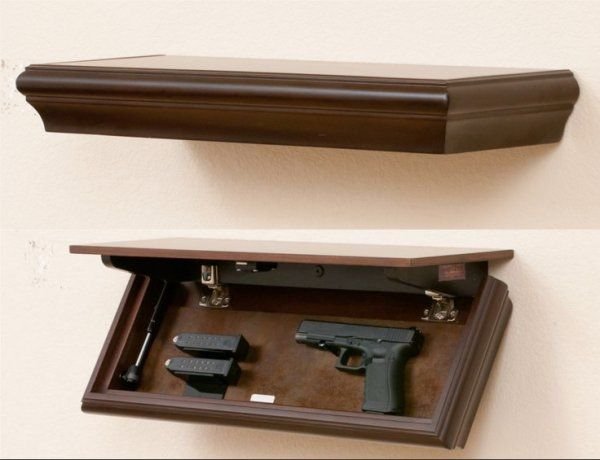
Hey there, fellow gun owners! Looking for a discreet and secure way to store your firearms? You've come to the right place. Today, we're diving into the world of in-wall gun cabinets, specifically how to install a hidden firearm safe within your home. It's not as complicated as it might seem, and with a little planning and effort, you can create a secure and concealed storage solution that blends seamlessly into your home decor. Let's get started!
Planning and Preparation
Before you grab your tools and start swinging a hammer, it's crucial to plan everything out. Here's a breakdown of what you need to consider:
Choosing the Right Location
First things first, choose a location for your hidden safe. Think about these factors:
- Accessibility: You want a spot you can easily access when needed, but not one that's readily visible to intruders. A closet, behind a bookshelf, or within a wall cavity are all good options.
- Structural Support: Ensure the wall you choose can support the weight of your safe. You don't want your safe crashing down on your toes!
- Aesthetics: If you're aiming for a seamless integration, select a location that won't draw attention. A bookshelf that covers the safe opening or a cabinet door that blends in are good ideas.
Selecting the Right Safe
The size and type of safe you choose will depend on the guns you plan to store and your budget. Here's what to consider:
- Size: Measure the available space in your chosen location to determine the maximum size of the safe you can accommodate.
- Fire and Water Resistance: Look for safes that offer both fire and water resistance. You never know when you might need that extra protection.
- Security Features: Go for a safe with robust locking mechanisms, preferably with a combination lock or electronic keypad. Avoid flimsy or easily compromised locks.
Gathering the Necessary Tools and Materials
You'll need a few essential tools and materials for this project. Here's a basic list:
- Power Drill
- Hammer Drill (optional)
- Measuring Tape
- Level
- Safety Glasses
- Work Gloves
- Drywall Saw
- Stud Finder
- Screwdrivers (various sizes)
- Wood Screws
- Drywall Anchors (if necessary)
- Caulk
- Paintable Caulking Compound
- Drywall Patching Compound
- Paint to Match Existing Wall
- Sandpaper
- Drop Cloth or Tarp
The Installation Process
Alright, let's dive into the installation process. Follow these steps carefully:
Step 1: Locate and Mark the Safe's Placement
Using your stud finder, locate the studs in your chosen wall section. Mark the safe's dimensions on the wall, making sure it's centered between the studs. This ensures it's securely anchored.
Step 2: Cut the Opening for the Safe
Now, it's time to cut out the opening for your safe. Use your drywall saw to carefully make the cut. Be sure to cut slightly smaller than the safe's dimensions to allow for a snug fit. You can always trim the opening if it's too small, but it's easier to make it a bit bigger than too small.
Step 3: Secure the Safe to the Wall
Position the safe within the opening and use the appropriate fasteners (provided with your safe or purchased separately) to secure it to the wall studs. Make sure it's perfectly level and firmly attached. You might need to use longer screws or anchors if the safe is heavy.
Step 4: Patch and Finish the Opening
Time to cover up the opening! Use your drywall patching compound to fill any gaps or holes around the safe. Make sure it's smoothed out and blended with the existing wall surface. Once it's dry, use sandpaper to smooth out any imperfections and paint to match the existing wall color. You can also use caulk to create a seamless transition between the safe and the wall.
Step 5: Install a Concealing Feature (Optional)
For an extra layer of concealment, install a bookshelf, cabinet door, or other feature that blends in with your existing decor. This will completely disguise the safe's presence. Make sure the concealment feature is securely attached to the wall and allows for easy access to the safe.
Step 6: Test the Safe's Operation
Before you consider your project complete, test the safe's operation. Make sure the door closes securely, the lock functions smoothly, and the safe is fully sealed. You want to make sure your firearms are safe and sound!
Safety Considerations
Safety is paramount when working on any home improvement project. Here are some key points to keep in mind:
- Wear Safety Glasses and Gloves: Always wear eye protection and work gloves to prevent injury from debris or tools.
- Be Mindful of Electrical Wiring: When cutting into walls, always use a stud finder and be extra cautious about any potential electrical wiring. If you're unsure, call a qualified electrician.
- Store Firearms Safely: Never leave firearms unattended and accessible to unauthorized individuals. Always use a locking mechanism and store ammunition separately from firearms.
Final Thoughts
Installing a hidden in-wall gun cabinet is a great way to protect your firearms while maintaining a clean and unobtrusive look in your home. Remember to plan your project thoroughly, follow the steps carefully, and always prioritize safety. With a bit of DIY know-how, you can have a secure and discreet firearm storage solution that gives you peace of mind. Happy building!